Choose your region and language
ApplyTiling a bathroom with HELIX: how to install wall tiles
Reading time: approx. 6 minutes
Tiling a bathroom yourself? A good result starts with proper preparation, the right materials and accurate installation. A tile leveling system helps minimise lippage between adjacent tiles and maintain a consistent joint width.
In this step-by-step guide, we explain how to tile a bathroom wall using the HELIX tile leveling system from Levelit.
What do you need?
To install and finish your bathroom tiles, you will need:
- bathroom tiles;
- suitable tile adhesive and grout;
- the Helix tile leveling system;
- a trowel and notched trowel;
- a mixer and mixing paddle;
- spirit level, tape measure and pencil;
- tile cutter or wet saw;
- rubber mallet;
- grout float;
- tiling wash kit.
Depending on the substrate and application, you may also need leveling, repair and waterproofing products.
Step 1. Prepare the substrate
Before you start, check that the wall to be tiled is clean, dry, stable and flat. Repair any holes and cracks beforehand and level out uneven areas where necessary. In wet areas, the substrate must also be properly waterproofed.
A tile leveling system is not designed to correct an uneven substrate. It helps minimise lippage between adjacent tiles during installation.
Step 2. Measure the bathroom wall
Measure the area to be tiled and determine the tile layout in advance. Take corners, pipes, sockets and other interruptions into account. Then calculate how many tiles, how much tile adhesive and how many HELIX clips you need. With the Levelit calculator, you can calculate how many clips you need based on your tile area and tile format.
Step 3. Prepare the tile adhesive
Prepare the tile adhesive according to the manufacturer’s instructions. Use clean water and a clean mixing bucket and follow the recommended mixing ratio. An electric mixer with a suitable mixing paddle allows you to mix the tile adhesive evenly.

Step 4. Apply the tile adhesive
Apply the tile adhesive with the flat side of the notched trowel and then comb it evenly with the notched side. Choose the appropriate notch size based on the tile format, substrate and tile adhesive being used.
For larger tile formats, back-buttering may be required, meaning that adhesive is also applied to the back of the tile. Only apply as much adhesive as you can work with within the adhesive’s open time
Not sure which notching size to choose? In our blog Which notched trowel do I need?, we explain which notched trowel to use for different tile sizes.
tep 5. Install wall tiles with Helix
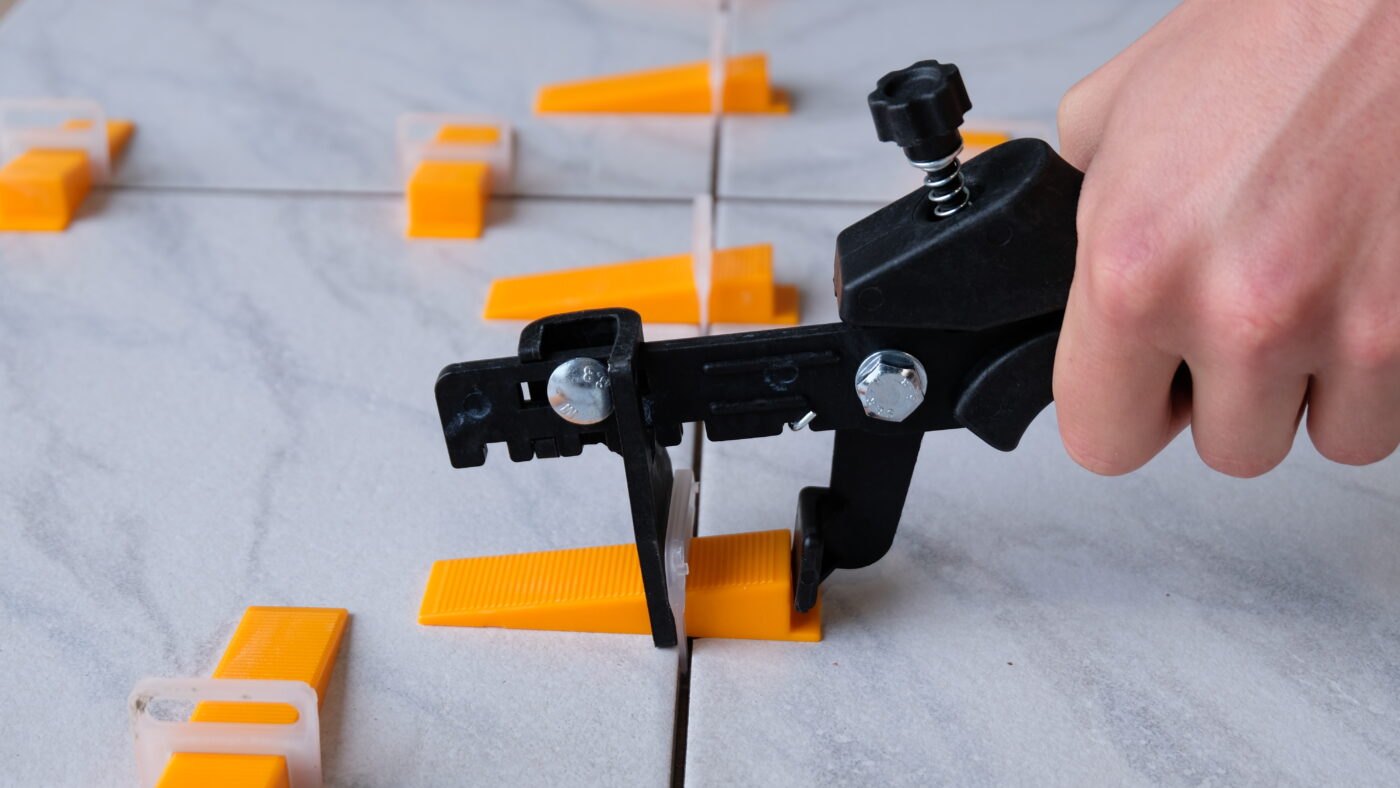
Place the first wall tile in the adhesive bed and use a spirit level to check that it is correctly positioned. Then slide the Helix clips underneath the edge of the tile and place the next tile against the clips. Next, screw a HELIX cap onto each clip. By tightening the caps in a controlled manner, adjacent tiles are brought to the same level during installation. Tighten the cap firmly, but do not force the system. Continue working row by row and regularly check that the tiles are level and correctly aligned.
HELIX clips are available in joint widths of 1.5, 2, 3 and 4 mm and are suitable for tiles 3 to 17 mm thick.
Want to know exactly how a tile levelling system works and why you should use one? Read our blog Tile levelling system: what is it and why should you use it?.

Step 6. Allow the tile adhesive to cure
Allow the tile adhesive to cure according to the adhesive manufacturer’s instructions. Then remove the HELIX clips by breaking them off in the direction of the joint. A rubber mallet can be used for this. The HELIX caps are reusable. After removing the clips, unscrew the caps and store them for your next tiling project.
Step 7. Grout the bathroom tiles
Once the tile leveling system has been removed and the tile adhesive has sufficiently cured, you can grout the tiles. Prepare the grout according to the manufacturer’s instructions and spread it diagonally across the tiles using a grout float, ensuring that the joints are completely filled. Remove excess grout and clean the tile surface at the appropriate time using a tile sponge. Allow the grout to cure fully afterwards.

With the HELIX tile leveling system, you can control both the height of adjacent tiles and the chosen joint width during installation. Choose the correct HELIX clip based on the desired joint width and check beforehand that the tile thickness falls within the 3 to 17 mm range.
Discover the complete HELIX range.
Frequently asked questions about bathroom tiling
How long should tile adhesive dry before removing the tile leveling system?
Do not wait longer than 24 hours. Remove the clips and caps before the adhesive has fully cured; otherwise, removal will become more difficult.
Can I use the tile leveling system to compensate for an uneven substrate?
No. A tile leveling system is not designed to correct unevenness in the substrate. Use a suitable leveling compound before you start tiling. Always begin with a flat substrate.
Are the clips and caps reusable?
The caps used with wall tiles are reusable for your next project. The clips themselves are single-use and should be disposed of with PMD waste.
Which Helix clip do I need?
Choose the clip based on the desired joint width. HELIX is available in 1.5, 2, 3 and 4 mm for tiles 3 to 17 mm thick. For thicker tiles, HELIX Long 2 mm is available for tiles 15 to 25 mm thick.
Do you have any questions or need advice? Feel free to contact us. Our team will be happy to help.
Related articles
Professional mortar mixer: Levelit MIX 1800 force
Spike roller for self-levelling compound: which one do you need?
