Choose your region and language
ApplyHow to lay a tiled patio: practical installation tips
Reading time: approx. 6 minutes
Author: Peter Goegebeur (Head of the Belgian Innovative Tile Academy)
When finishing floor and wall tiles in residential projects, quality standards are becoming increasingly strict.
The quality requirements for wall and floor tiling in residential projects are becoming increasingly stringent, partly due to rising expectations among end users. Specification writers, training providers and those responsible for installation guidelines therefore need to take these expectations into account. Architects are also adapting their standards and specifications to reflect new requirements and trends, including tighter finishing tolerances for tilers.

Technical considerations when laying a tiled patio
The importance of accuracy in tiling
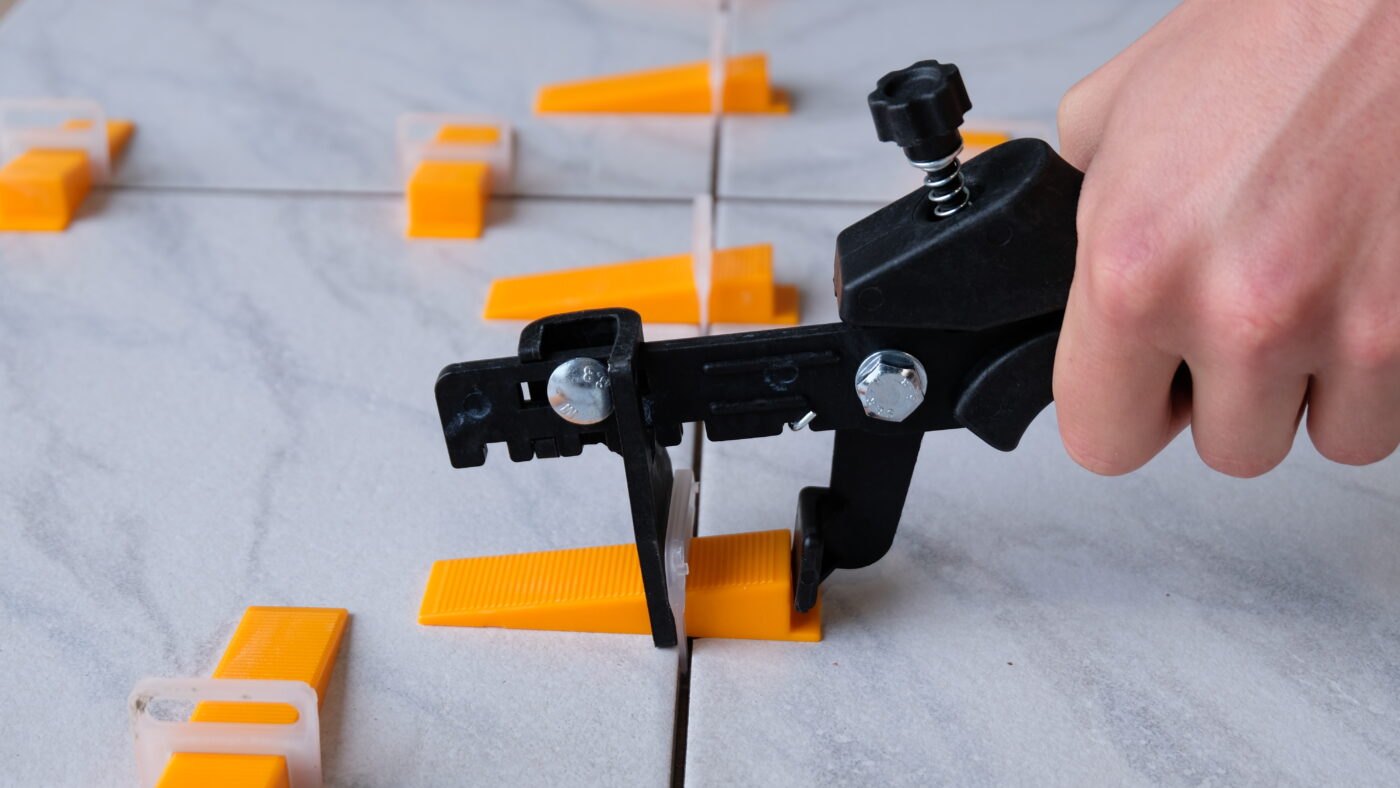
Correct levels and overall flatness are important in both wall and floor tiling, but so is minimising height differences between adjacent tiles, regardless of their size. Tile levelling systems can help achieve this and can also be used for outdoor tiling. LEVELIT helps keep both thin large-format tiles and thicker patio tiles correctly aligned during installation.
Durability and the challenges of outdoor patios
Durability is a key consideration when laying a tiled patio. Building an outdoor patio directly over the ground is more complex than it may initially appear. The process starts by excavating the soil until a stable base is reached. Ground conditions can vary considerably by region, from sandy soils in coastal areas to clay soils in low-lying regions and stony ground elsewhere. Careful assessment of the existing ground conditions is therefore essential before work begins.
Aesthetic and practical considerations
A well-designed tiled patio can significantly enhance an outdoor space and provide an attractive area for relaxing and entertaining. However, outdoor tiling is exposed to demanding conditions, including temperature fluctuations, sunlight, rain, hail, frost, intensive use and different types of staining on both the tiles and joints. Without the right materials, installation method and finishing techniques, the completed patio may fail to meet the expected performance and finish.
Patio build-up, movement and drainage
The type and thickness of the different layers beneath the patio must be determined according to the available construction depth and the loads that the tiled surface will need to withstand. The design and installation must also take account of expected thermal movement and provide an effective system for draining rainwater. Accurate installation is essential. Appropriate movement accommodation and efficient drainage both play a crucial role in achieving a durable tiled patio.
How to lay a tiled patio
This guide focuses specifically on the bonded installation of tiles over a hardened screed for an outdoor patio. It covers the correct build-up both with and without a drainage and uncoupling membrane, as well as the use of installation tools and systems to achieve an accurate finish. These systems help control the finished tile surface and maintain consistent joint widths. Both factors contribute to the performance, appearance and durability of the finished patio.
1. Excavate and construct the base layers
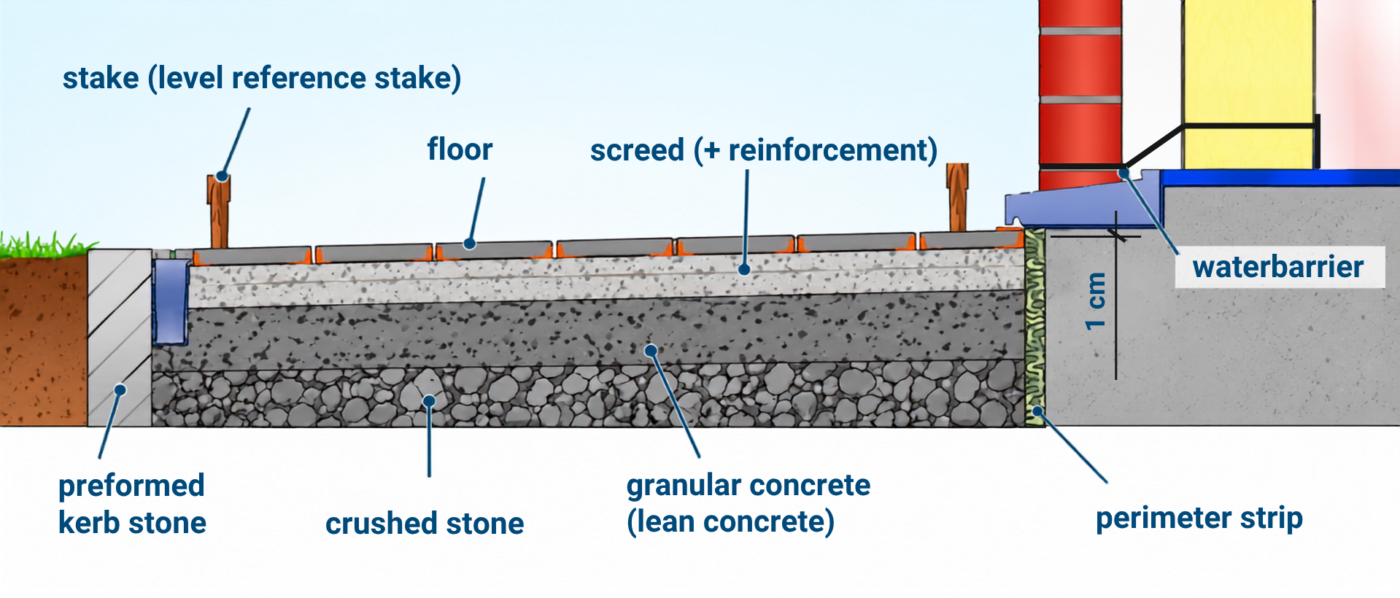
The ground is generally excavated to a depth of 30 to 40 cm, depending on local soil conditions, to create a stable base for the patio. The different layers are then constructed. A layer of free-draining crushed stone forms the base, followed by a compacted but sufficiently water-permeable layer of crushed concrete or granular concrete. The screed, sometimes referred to as the compression layer, is installed above this. The screed should be at least 5 cm thick. The other layers should each be approximately 10 to 15 cm thick, depending on the materials used, including aggregate size, cement content and water/cement ratio.
2. Set the finished patio level and drainage fall
The finished level of an outdoor patio adjoining a property is usually determined in relation to the thresholds of external doors and windows. The finished patio should always sit slightly below the damp-proofing or waterproofing level, typically around 1 cm below the threshold. From this point, provide a fall of approximately 1.5%, or 1.5 cm per metre, taking the slip resistance and surface texture of the tiles into account. Effective drainage is essential. The texture of the tile surface and the drainage system must both be considered to prevent standing water on the patio. The lower layer of free-draining crushed stone is generally installed over a geotextile membrane and compacted horizontally. For optimum drainage, it is advisable to install the crushed-concrete layer between the crushed stone and screed at a 2% fall.
Practical installation tips
- Installing the screed: Apply a screed of stabilised coarse sand with a suitable cement content over the underlying base layers so that it can cure correctly and effectively.
- Drainage and uncoupling membrane: Once the screed has cured, installing a drainage and uncoupling membrane is recommended. This can increase the service life of the patio by isolating cracks and deformation in the screed so that they are less likely to transfer into the tiled finish. The membrane also promotes drying beneath the tiles and helps drain rainwater, reducing moisture accumulation.
- Layout and finish: Plan the tile layout symmetrically wherever possible to avoid conspicuous narrow cuts or awkward pieces around the perimeter.
- Tiling with the LEVELIT system: Use a sufficiently thick adhesive bed when tiling the patio. Regularly check that the base of each LEVELIT clip is fully embedded in the adhesive.

3. Before laying the patio tiles
Any screed that is excessively rough, dusty or friable must first be treated, prepared or repaired. Tiles should always be installed using the buttering-floating method, with adhesive applied to both the substrate and the back of the tile. With this installation method, parallel adhesive ribs are brought together and the tile is moved across the direction of the ribs to achieve optimum adhesive coverage. A flow-bed adhesive can be used as an alternative. Even with this method, however, the back of the tile should be coated to create a reliable bond. This is particularly important with ceramic tiles, as the back of the tile may be contaminated with engobe dust or magnesium powder. When installing natural stone, coating the back of the tile is also often necessary to achieve an effective bond. Always make sure that the tile adhesive is suitable for exterior use. Consult the manufacturer’s technical data sheet or contact its technical adviser if you are unsure.

Practical tips for using the LEVELIT wedge system outdoors
- Determine the required joint width before ordering your clips. For outdoor tiling, a minimum joint width of 4 mm is recommended.
- Make sure the adhesive bed is sufficiently thick for the base of the LEVELIT levelling clip to be fully embedded.
- Carefully slide the base of the levelling clip beneath the tile and into the adhesive before pressing the tile firmly into position.
- Do not position clips too close to the corners of adjoining tiles. If wedges are positioned too close together at the corners, they can interfere with each other when the clips are knocked out and may cause the clips to break incorrectly. As a general rule, keep them approximately 5 to 7 cm from the corners.
- Adjust the levelling pliers to the correct setting before you start. This makes installation easier and helps you apply consistent pressure to each wedge.
- Insert the wedges in the direction of the previously laid tile.
- Tighten the clips sufficiently, but do not overtighten them, as this can put unnecessary strain on the clip or pliers.

4. Grouting the tiled patio
Grouting an outdoor tiled patio broadly follows the same process as grouting indoor tiles. The main difference is the choice of grout, which should ideally have water-repellent properties. This helps limit unwanted water ingress and protects the installation against frost damage.
- Provide a flexible perimeter joint: Hygrothermal movement, including expansion and contraction, must be accommodated between the tiled patio and the walls of the building. A highly elastic, waterproof silicone sealant or suitable movement-joint profile can be used for this purpose. This helps accommodate stresses caused by changes in temperature and moisture and reduces the risk of cracking or debonding.
- Divide large tiled areas into smaller bays: Dark tiles absorb more heat, so it is advisable to divide large tiled areas into smaller sections. Movement joints should be installed at least every 6 metres for light-coloured tiles (maximum 36 m²) and every 5 metres for dark-coloured tiles (maximum 25 m²). In some situations, including installations using large-format tiles, smaller and preferably square bays may be required so that individual sections can move independently.
- Installing an elastic sealant joint: When forming an elastic sealant joint, a polystyrene backing material can be used to achieve the required two-sided adhesion between the tiles. Three-sided adhesion should be strictly avoided so that the polymer joint can retain its full movement capability in the event of significant lateral movement.
- Timing before grouting: Do not wait too long before removing the wedges and clips from the LEVELIT system on average, no more than 24 hours after laying the tiles. Adhesive residue may remain in the joints and bond around the clips. When the clips are knocked out, small pieces of plastic can then remain trapped in the joints. These can, however, be removed afterwards with a utility knife.
Explore our complete range of tile levelling systems on our website or browse our latest catalogue.
Related articles
Professional mortar mixer: Levelit MIX 1800 force
Spike roller for self-levelling compound: which one do you need?
